


- OVERVIEW
- TECHNICAL SPECS
- INSTALL SUPPORT
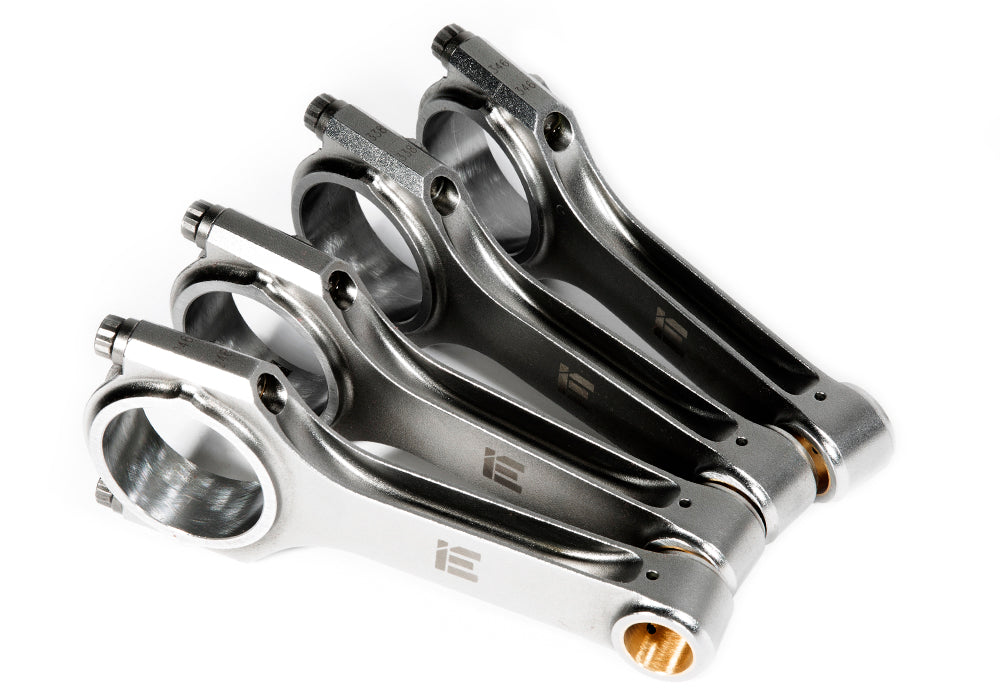
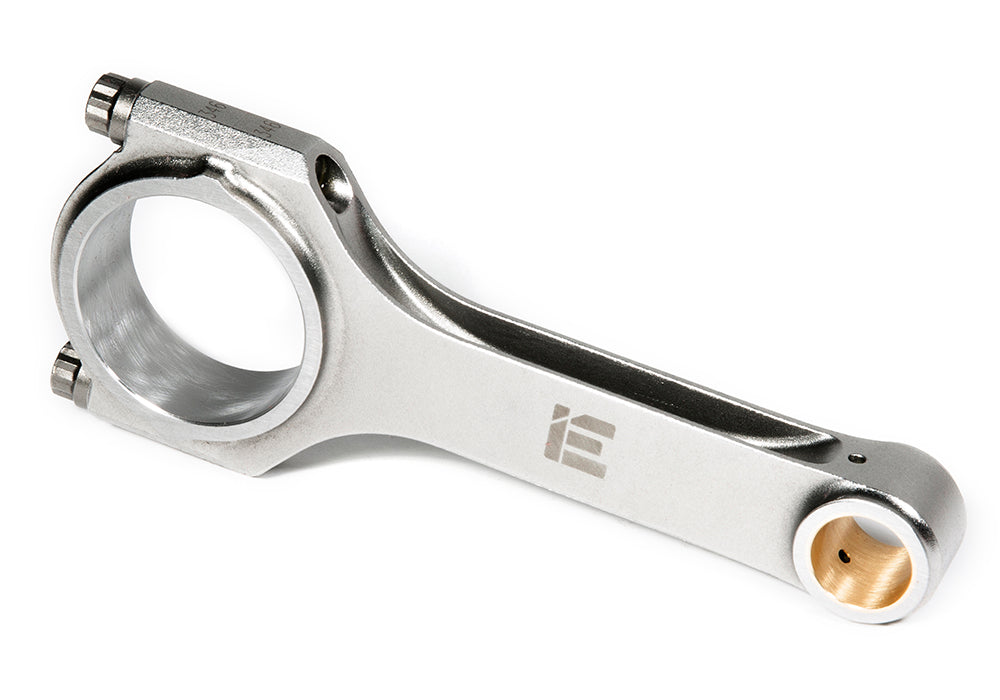
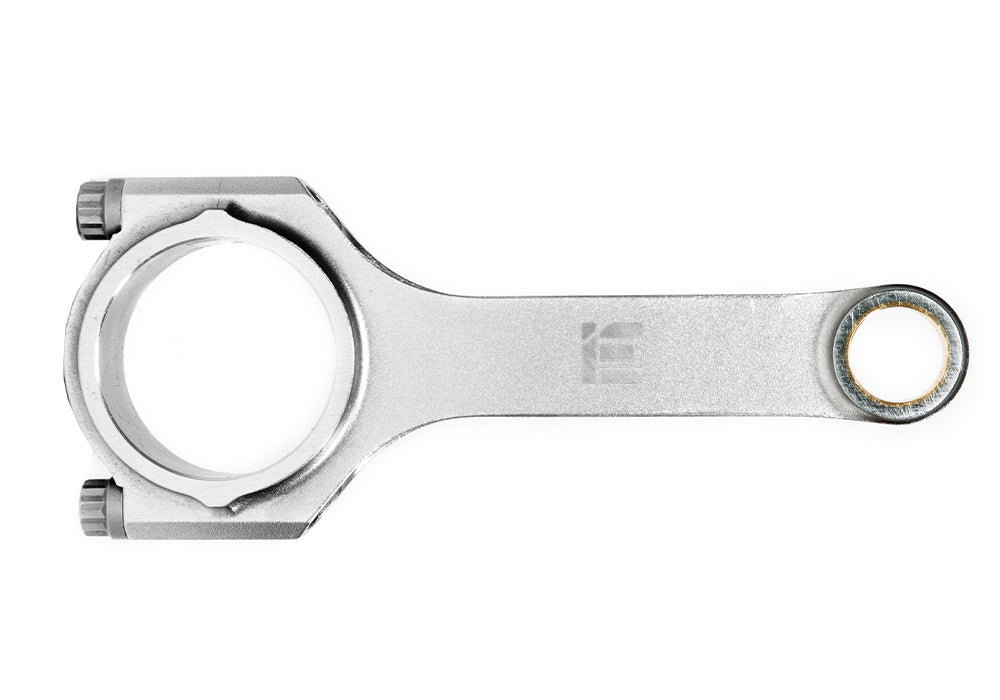
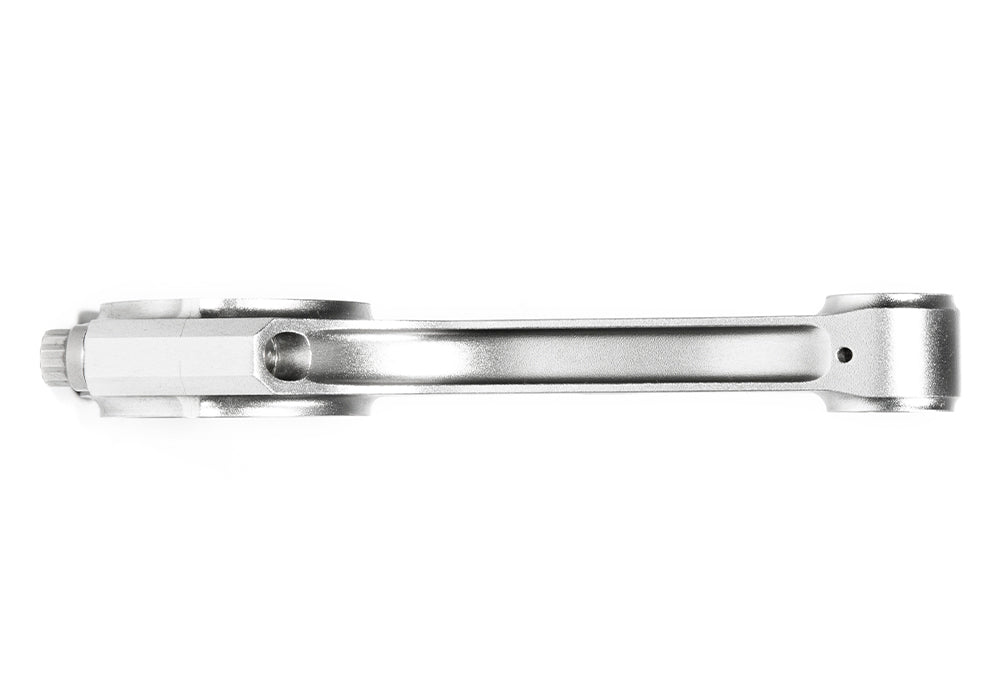
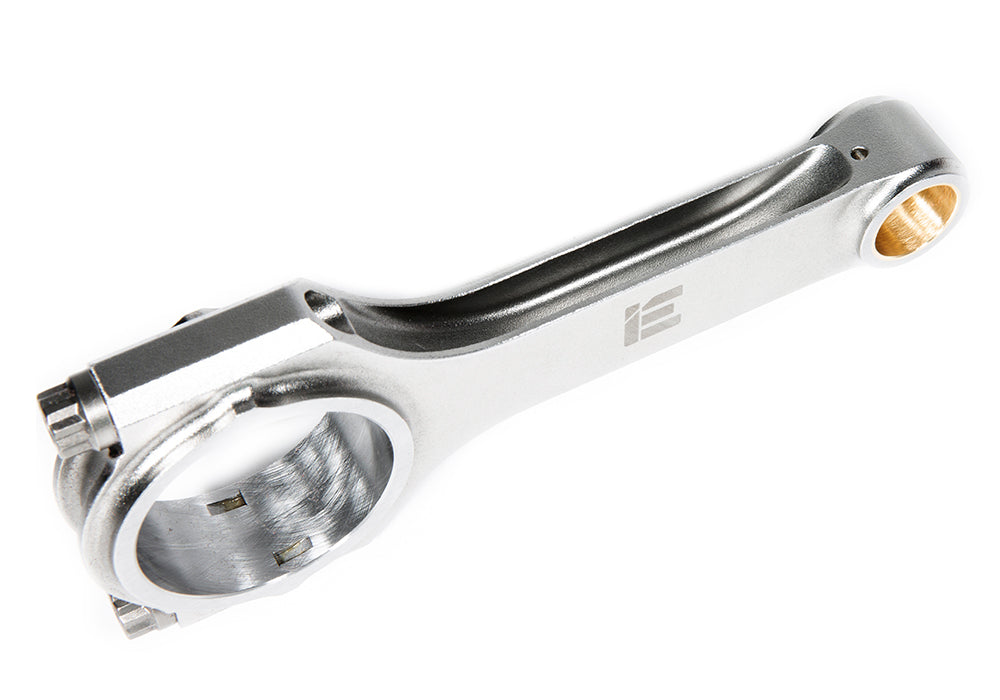
IE H-BEAM CONNECTING ROD SET | 144X20
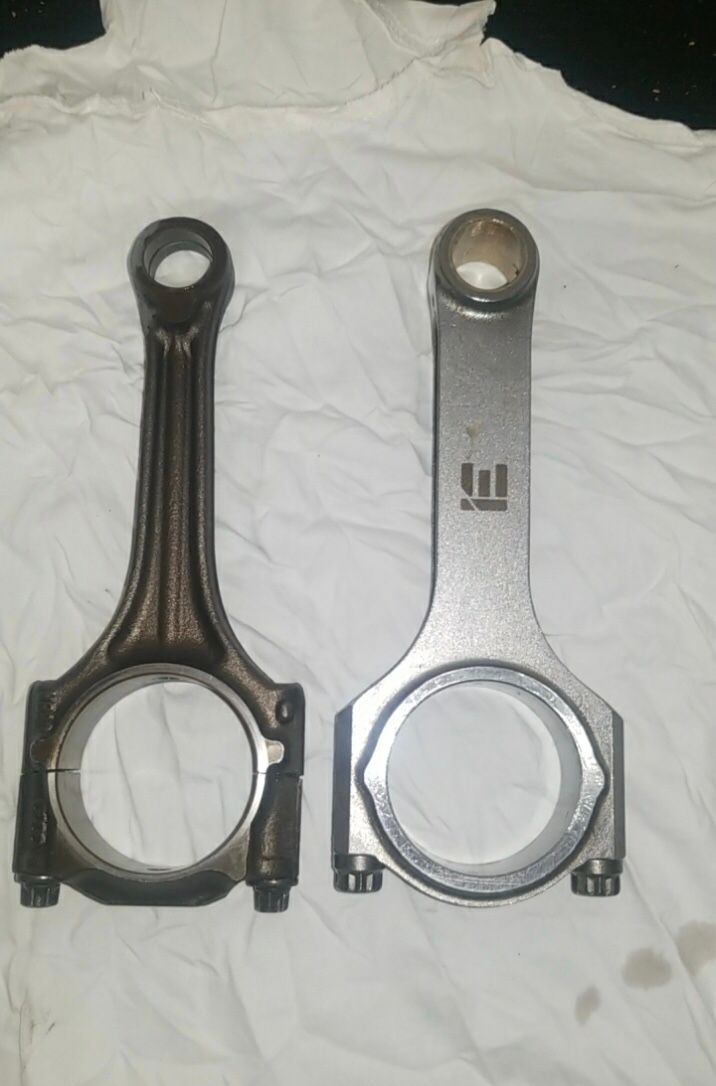
Achieve your performance goals with IE H-beam connecting rods that will make your build a success. IE Rods are designed for strength and reliability to support performance builds up to 600 horsepower and torque. Engineered to be fairly light weight for a high power to weight ratio making them the perfect choice for aggressive street builds.
LEADING BENEFITS
- Supports far more horsepower and torque than the stock components
- Keeps your engine reliable for upgraded turbos and superchargers
- Supports higher RPMs to squeeze out more top end power
- Safeguards your engine to ensure a successful project
- Supports up to 600 horsepower and torque (for higher power builds consider IE Tuscan I-beam Connecting Rods)
DESIGN FEATURES
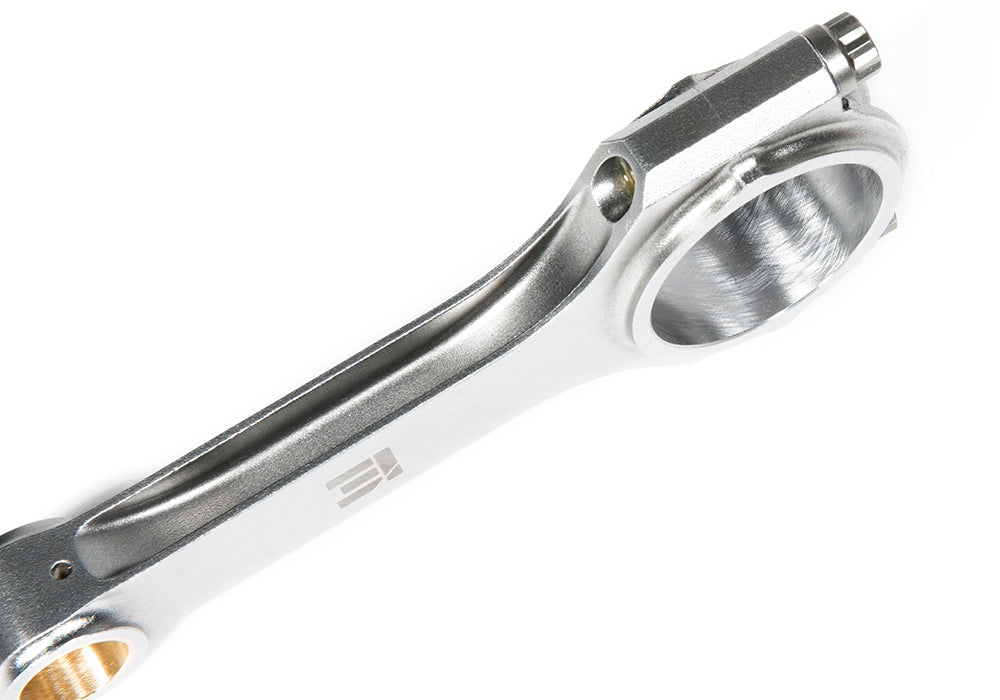
- Extra strong forged 4340 chromoly steel
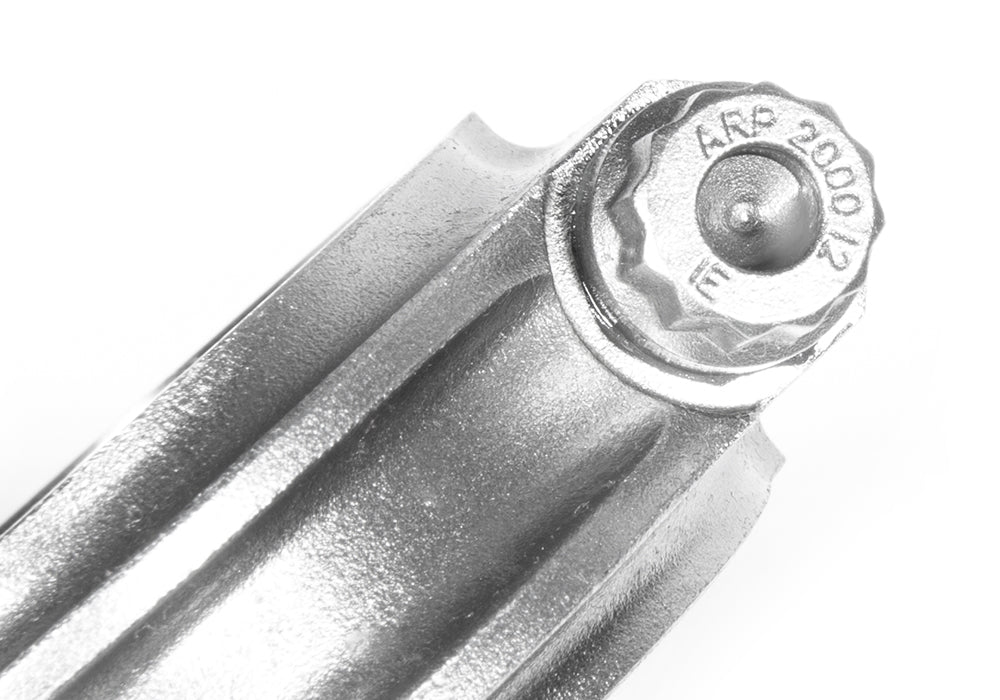
- Made in USA ARP 2000 rod bolts
- Computer optimized on a specific application basis
- Honed to exact tolerance on USA made Sunnen machinery
- Each set balanced to +/- 1 gram
- Thoroughly quality controlled dimensionally and for material quality
- H-beam design optimized to be lightweight and strong for daily driven cars
- Tanged rod bearings for extra security and reliability
- Optional rifle drilling for increased wristpin and bushing life
HIGHLY ENGINEERED IN-HOUSE
All IE connecting rods are designed on and per engine application basis for factors such as cylinder pressure and rotating assembly mass. Many other brands simply change dimensions and do not engineer for the specific application at hand. FEA and computer simulation software is used to ensure the highest quality product.
FEA software is used to verify structural integrity while optimizing strength to weight ratios
Leading edge CAD software is leveraged to build application specific designs
MACHINED & INSPECTED IN USA
The two most important dimensions of a connecting rod are the tolerances and roundness of the crankshaft journals and wristpin bushings. IE Rods are machined in-house on our top-of-the line USA made Sunnen rod hone machine that ensures proper critical roundness. After machine work is finished, every rod set undergoes a strict quality control process to verify all tolerances, weight balance, bolt threads, and surface finishes.
Honed to exacting tolerances within 250 millionths of an inch
Multiple QC processes ensure proper clearances
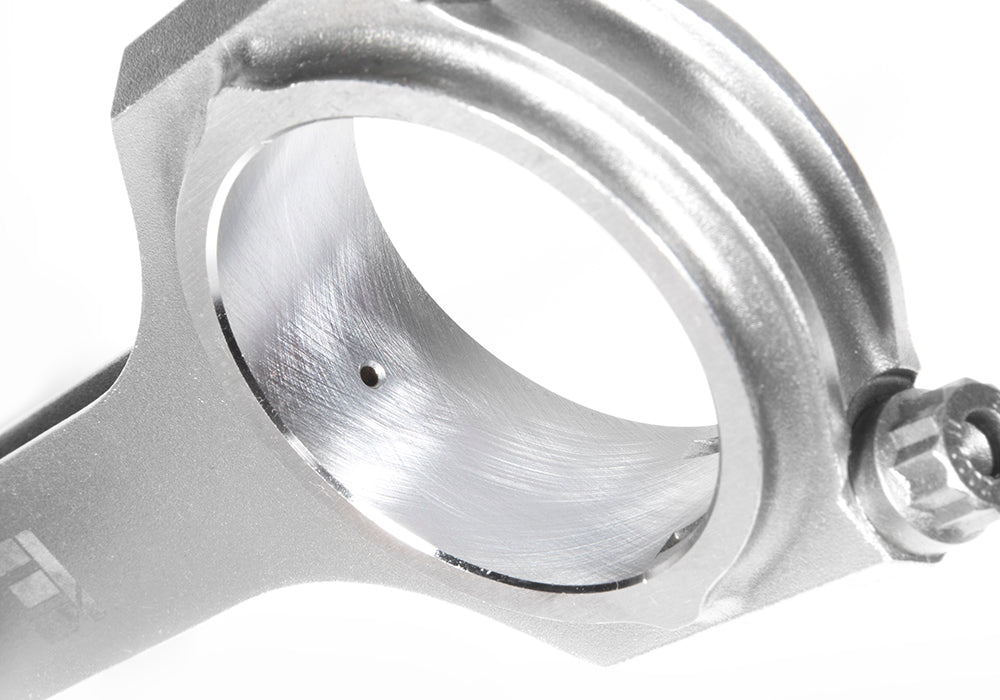
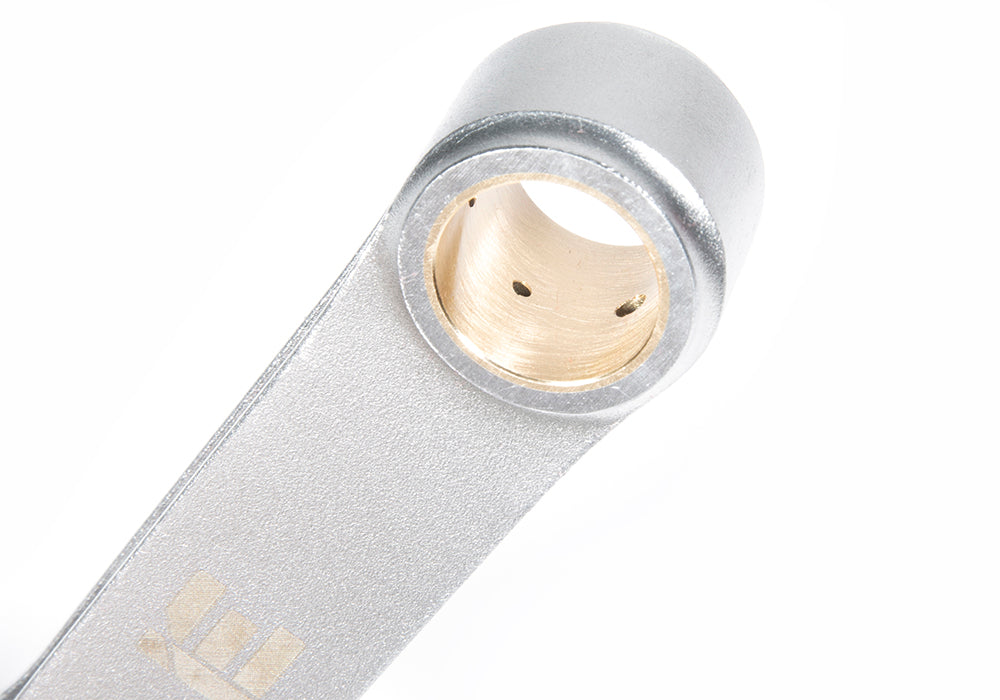
OPTIONAL RIFLE DRILLING
Rifle drilling is a machining process that adds a small hole directly through the center of the connecting rod. This galley force-feeds oil pressure from the crankshaft journal through the rod to the wrist pin bushing. Providing extra lubrication greatly extends engine life and reduces wear on the wrist pin and wrist pin bushing. Rifle drilling upgrade is highly recommended for street cars that will be driven for extended miles.
H beam cross section model details the rifle drilled oil galley for forced pin oiling
VEHICLE FITMENT
This 144X20 connecting rod set will only work with factory-equipped pistons that use 20mm wrist pins and non-tapered rods. Many 1.8T 20V (06A) and 2.0T FSI (EA113) engines use a tapered rod, for these engines please see our drop-in rod options if you wish to keep factory pistons. Use the piston fitment guide in the technical specs tab to verify factory piston compatibility
| MAKE | MODEL | YEAR | GENERATION |
| AUDI | A4 1.8T | 1996 - 2001 | B5 - B5.5 |
| AUDI | A4 1.8T | 2002 -2005 | B6 |
| AUDI | A4 2.0T FSI | 2005 - 2008 | B7 |
| AUDI | A6 1.8T | 1998 - 2004 | C5 |
| AUDI | A6 Allroad 1.8T | 1998 - 2004 | C5 |
| AUDI | A6 2.0T FSI | 2005 - 2011 | C6 |
| AUDI | A6 Allroad 2.0T FSI | 2005 - 2011 | C6 |
| AUDI | TT 1.8T | 2000 - 2006 | 8N |
| AUDI | TT 2.0T FSI | 2008 - 2010 | 8J |
| AUDI | TTS | 2008 - 2015 | 8J |
| AUDI | A3 1.8T | 1996 - 2003 | 8L |
| AUDI | S3 | 1996 - 2003 | 8L |
| AUDI | A3 2.0T FSI | 2006 - 2008 | 8P |
| AUDI | S3 | 2006 - 2013 | 8P |
| VW | Golf 2.0L | 1993 - 1999 | MK3 |
| VW | Golf 1.8T & 2.0L | 1999 - 2005 | MK4 |
| VW | GTI 1.8T | 1999-2005 | MK4 |
| VW | GTI | 2006 - 2009 | MK5 |
| VW | Golf R | 2012 - 2013 | MK6 |
| VW | Jetta 2.0L | 1993 - 1999 | MK3 |
| VW | Jetta / GLI 1.8T & 2.0L | 1999 - 2005 | MK4 |
| VW | Jetta / GLI 2.0T FSI | 2006 - 2008 | MK5 |
| VW | Beetle 1.8T, 2.0L, & 2.0T FSI | 1998 - 2010 | 1C / 9C / 1Y |
| VW | Passat 1.8T | 1998 - 2005 | B5 - B5.5 |
| VW | Passat 2.0T FSI | 2006 - 2010 | B6 |
| VW | EOS 2.0T FSI | 2006 - 2010 | 1F7 |
| VW | Corrado G60 & 2.0L | 1998 - 1995 | A3 |
TECHNICAL SPECIFICATIONS: IERHVA1 RODS
ROD DIMENSIONS
COMPATIBLE BEARINGS
This set of IE connecting rods is designed for use with tanged style rod bearings only. Tanged bearings locate and lock into the journal, reducing the chances of bearing spin and less chance of bearing failures.
Best for high-powered race and street driven engines.
Great for mid-high powered street driven engines.
PISTON FITMENT
Refer to the guide below to verify piston compatibility by engine code.
| MAKE | ENGINE | PISTON | ENGINE CODE |
| AUDI & VW | 1.8T 20V | Stock & aftermarket | AEB, AGU, AMK, AMU, APX, APY, ATC, ATW, AWD, AYP, BAM, BEA |
| AUDI & VW | 1.8T 20V | Aftermarket only | AMB, ARX, ARY, ATW, AUM, AWM, AWP, AWW, BJX |
| AUDI & VW | 2.0T FSI EA113 | Aftermarket only | All engine codes |
| VW | 2.0L 8V | Aftermarket only | AEG, AZG |
| VW | 2.0L 16V | Stock & aftermarket | 9A, KR, PL |
| VW | 1.8L 8V | Stock & aftermarket | JH |
| VW | G60 | Aftermarket only | PG |
This 144X20 connecting rod set will only work with VW/Audi engines with factory pistons that use 20mm wrist pins on factory non-tapered rods.
1.8T STROKER KIT COMPATIBLE
Looking to increase the displacement of your VW or Audi 1.8T 20V (06A) engine? This connecting rod set is compatible with stroker crankshafts and 20mm wrist pin stroker pistons for either 2.0L or 2.1L stroker conversions.
CONNECTING ROD FAQ
Are these are a direct replacement for factory rods?
-This rod set fits several VW/Audi engines with a 144mm journal bore and is a direct rod replacement for engines with a 20mm non-tapered wrist pin. For engine variations with a tapered or different size wrist pin, an aftermarket 20mm piston will be required. Please refer to the vehicle and piston application tables for fitment guides.
Are these connecting rods forged?
-All Integrated Engineering Connecting Rods are made from extremely durable 4340 material forgings.
Do these rods require any additional machine work for installation?
-IE connecting rods themselves are machined, balanced, and ready for installation. The engine block may require machine work when installing new rods such as a surface deck and cylinder hone.
When do I need IE Tuscan I Beam rods over H beam rods?
-IE 4 cylinder H-beam rods are rated for about 600 horsepower and 600 torque (ft/lbs). If you are planning on exceeding these power levels we recommend upgrading to our Tuscan I-beam Rods.
What are the most common reasons for connecting rod failure?
-Connecting rods are one of the highest stressed components in your engine, and several factors can contribute to a failure. The most common rod failures happen by oil starvation, improper ECU tuning, improper bearing clearances, or installation mistakes. Professional installation of your new connecting rods and ECU tuning is crucial to ensure your IE rods stay inside of your engine block.
INSTALLATION SUPPORT
The following information is supplied as best practices and tips for your connecting rod installation and not intended to be used as a complete install guide.
Engine assembly should always be performed by a trained technician with professional tools.
BEFORE YOU BEGIN
Prepare a clean indoor work surface such as a stainless bench. Unpack your rods, remove the rod bolts with an 11mm 12 point socket, and split the bearing caps from the rods. Use brake cleaner with a lint-free rag to remove all rust inhibitor oils from the surface, threads, journals, bushings, and rifle drilling channel (if present). Visually inspect all rod surfaces.
TOOLS & SUPPLIES:
- Socket wrench
- 11mm 12 point socket
- Torque wrench (quality & calibrated)
- Dial bore gauge
- Secured bench vise
- Bolt stretch gauge (optional)
- thread tap/thread gauge (optional)
- ARP bolt lube (supplied with rods)
- Marker
- Carb cleaner
- Lint-free rags
VERIFY CLEARANCES
Before installing your connecting rods into the engine, all critical clearances should be measured and recorded. Label each rod, bearing set, crankshaft journal, and wrist pin 1-4 with a marker to keep track of your measurements. Using a vice, assemble the rod with the rod bearings, rod bolts, and ARP assembly lube. Torque the rod bolts using the torque procedure on this page. Make sure the printed numbers on the rod and rod cap match and are installed on the same side.
Using a quality bore gauge and micrometer, record the following measurements:
- Wrist pin diameter
- Wrist pin bushing bore
- Wrist pin clearance (Bore minus diameter | Target: .0003"-.0005")
- Rod journal (w/bearings)
- Crankshaft journal diameter
- Journal clearance (Bore minus diameter | Target: .0015"-.0025")
Measure clearances with a quality bore gauge and micrometer only, do not use a Plastigage type product.
SPEC SHEET
Taking the time to measure and verify all critical clearances of the rotating assembly can be the difference between bullet proof reliability or a costly engine rebuild. Building a record of these details can identify issues and provides a reference during assembly or later diagnosis. To help make your engine build a success, download our official IE Engine Specification Sheet.
TORQUE PROCEDURE
Accurate rod bolt pre-load is required to ensure proper bore clearances and roundness of the connecting rod big end for both measuring and final installation of your connecting rods. Before you begin, clean the rod mating surfaces and remove all packaging oil from the threads and rod bolts.
STEP 1 -PRE-TORQUE:
Before you final stretch your rod bolts, it's important the bolt and rod threads are fully seated.
- Install rod bearings
- Align matching printed numbers on rod and cap
- Assemble cap to rod
- Apply ARP assembly lube to bolt threads
- Hand tighten bolts
- Using a quality calibrated torque wrench, torque bolts to 50 ft/lbs
- Break bolts loose, and again torque to 50 ft/lbs
- Break bolts loose, then torque to 50 ft/lbs one final time
STEP 2 -FINAL TORQUE:
The final torque spec is .006" (stretch gauge) or 50 ft/lbs (torque wrench) with ARP assembly lube. The preferred method of measuring bolt load is with a stretch bolt gauge.
Stretch Gauge
- Loosen bolt and zero stretch gauge
- Tighten bolt to .006" stretch
- Loosen second bolt and zero stretch gauge
-
Tighten second bolt to .006" stretch
Torque Wrench
- Loosen bolt
- Tighten bolt to 50 ft/lbs
- Loosen second bolt
- Tighten second bolt to 50 ft/lbs
Important notes
- Do not exceed rod bolt stretch/torque. If bolt stretch is exceeded, replace rod bolts with new ones.
- Torque wrench settings are given as a guide only, to ensure proper bolt installation a stretch gauge is required.
- Do not install bolts dry or with any other lubricant than the supplied ARP assembly lube.
Have questions? Don't worry, our team of engine specialist are here to help. Fill out the form on our Contact Page to start a help ticket.
- OVERVIEW
- TECHNICAL SPECS
- INSTALL SUPPORT
IE ROD SET
144X20
Achieve your performance goals with IE H-beam connecting rods that will make your build a success. IE Rods are designed for strength and reliability to support performance builds up to 600 horsepower and torque. Engineered to be fairly light weight for a high power to weight ratio making them the perfect choice for aggressive street builds.
LEADING BENEFITS
Supports far more horsepower and torque than the stock
Keeps your engine reliable for increased boost
Safely supports higher RPMs
Safeguards your engine to ensure a successful project
Supports up to 600 horsepower and torque
DESIGN FEATURES
Extra strong forged 4340 chromoly steel
Made in USA ARP 2000 rod bolts
Computer optimized on a specific application basis
Honed to exact tolerance on USA made machinery
Each set balanced to +/- 1 gram
Quality controlled dimensionally and for material quality
Optimized to be lightweight and strong for daily driven cars
Tanged rod bearings for extra security and reliability
Optional rifle drilling for increased wristpin and bushing life
ENGINEERED IN-HOUSE
All IE connecting rods are designed on and per engine application basis for factors such as cylinder pressure and rotating assembly mass. Many other brands simply change dimensions and do not engineer for the specific application at hand. FEA and computer simulation software is used to ensure the highest quality product.
FEA software is used to verify structural integrity while optimizing strength to weight ratios
Leading edge CAD software is leveraged to build application specific designs
MACHINED IN USA
The two most important dimensions of a connecting rod are the tolerances and roundness of the crankshaft journals and wristpin bushings. IE Rods are machined in-house on our top-of-the line USA made Sunnen rod hone machine that ensures proper critical roundness. After machine work is finished, every rod set undergoes a strict quality control process to verify all tolerances, weight balance, bolt threads, and surface finishes.
Honed to exacting tolerances within 250 millionths of an inch
Multiple QC processes ensure proper clearances
OPTIONAL RIFLE DRILLING
Rifle drilling is a machining process that adds a small hole directly through the center of the connecting rod. This galley force-feeds oil pressure from the crankshaft journal through the rod to the wrist pin bushing. Providing extra lubrication greatly extends engine life and reduces wear on the wrist pin and wrist pin bushing. Rifle drilling upgrade is highly recommended for street cars that will be driven for extended miles.
H beam cross section model details the rifle drilled oil galley for forced pin oiling
VEHICLE FITMENT
This 144X20 connecting rod set will only work with factory-equipped pistons that use 20mm wrist pins and non-tapered rods. Many 1.8T 20V (06A) and 2.0T FSI (EA113) engines use a tapered rod, for these engines please see our drop-in rod options if you wish to keep factory pistons. Use the piston fitment guide in the technical specs tab to verify factory piston compatibility
| MAKE | MODEL | YEAR | GENERATION |
| AUDI | A4 1.8T | 1996 - 2001 | B5 - B5.5 |
| AUDI | A4 1.8T | 2002 -2005 | B6 |
| AUDI | A4 2.0T FSI | 2005 - 2008 | B7 |
| AUDI | A6 1.8T | 1998 - 2004 | C5 |
| AUDI | A6 Allroad 1.8T | 1998 - 2004 | C5 |
| AUDI | A6 2.0T FSI | 2005 - 2011 | C6 |
| AUDI | A6 Allroad 2.0T FSI | 2005 - 2011 | C6 |
| AUDI | TT 1.8T | 2000 - 2006 | 8N |
| AUDI | TT 2.0T FSI | 2008 - 2010 | 8J |
| AUDI | TTS | 2008 - 2015 | 8J |
| AUDI | A3 1.8T | 1996 - 2003 | 8L |
| AUDI | S3 | 1996 - 2003 | 8L |
| AUDI | A3 2.0T FSI | 2006 - 2008 | 8P |
| AUDI | S3 | 2006 - 2013 | 8P |
| VW | Golf 2.0L | 1993 - 1999 | MK3 |
| VW | Golf 1.8T & 2.0L | 1999 - 2005 | MK4 |
| VW | GTI 1.8T | 1999-2005 | MK4 |
| VW | GTI | 2006 - 2009 | MK5 |
| VW | Golf R | 2012 - 2013 | MK6 |
| VW | Jetta 2.0L | 1993 - 1999 | MK3 |
| VW | Jetta / GLI 1.8T & 2.0L | 1999 - 2005 | MK4 |
| VW | Jetta / GLI 2.0T FSI | 2006 - 2008 | MK5 |
| VW | Beetle 1.8T, 2.0L, & 2.0T FSI | 1998 - 2010 | 1C / 9C / 1Y |
| VW | Passat 1.8T | 1998 - 2005 | B5 - B5.5 |
| VW | Passat 2.0T FSI | 2006 - 2010 | B6 |
| VW | EOS 2.0T FSI | 2006 - 2010 | 1F7 |
| VW | Corrado G60 & 2.0L | 1998 - 1995 | A3 |
TECHNICAL SPECS
ROD DIMENSIONS
COMPATIBLE BEARINGS
This set of IE connecting rods is designed for use with tanged style rod bearings only. Tanged bearings locate and lock into the journal, reducing the chances of bearing spin and less chance of bearing failures.
Best for high-powered race and street driven engines.
Great for mid-high powered street driven engines.
PISTON FITMENT
Refer to the guide below to verify piston compatibility by engine code.
| MAKE | ENGINE | PISTON | ENGINE CODE |
| AUDI & VW | 1.8T 20V | Stock & aftermarket | AEB, AGU, AMK, AMU, APX, APY, ATC, ATW, AWD, AYP, BAM, BEA |
| AUDI & VW | 1.8T 20V | Aftermarket only | AMB, ARX, ARY, ATW, AUM, AWM, AWP, AWW, BJX |
| AUDI & VW | 2.0T FSI EA113 | Aftermarket only | All engine codes |
| VW | 2.0L 8V | Aftermarket only | AEG, AZG |
| VW | 2.0L 16V | Stock & aftermarket | 9A, KR, PL |
| VW | 1.8L 8V | Stock & aftermarket | JH |
| VW | G60 | Aftermarket only | PG |
This 144X20 connecting rod set will only work with VW/Audi engines with factory pistons that use 20mm wrist pins on factory non-tapered rods.
CONNECTING ROD FAQ
Are these are a direct replacement for factory rods?
This rod set fits several VW/Audi engines with a 144mm journal bore and is a direct rod replacement for engines with a 20mm non-tapered wrist pin. For engine variations with a tapered or different size wrist pin, an aftermarket 20mm piston will be required. Please refer to the vehicle and piston application tables for fitment guides.
Are these connecting rods forged?
All Integrated Engineering Connecting Rods are made from extremely durable 4340 material forgings.
Do these rods require any additional machine work?
IE connecting rods themselves are machined, balanced, and ready for installation. The engine block may require machine work when installing new rods such as a surface deck and cylinder hone.
When do I need IE Tuscan I Beam rods over H beam rods?
IE 4 cylinder H-beam rods are rated for about 600 horsepower and 600 torque (ft/lbs). If you are planning on exceeding these power levels we recommend upgrading to our Tuscan I-beam Rods.
What causes connecting rod failure?
Connecting rods are one of the highest stressed components in your engine, and several factors can contribute to a failure. The most common rod failures happen by oil starvation, improper ECU tuning, improper bearing clearances, or installation mistakes. Professional installation of your new connecting rods and ECU tuning is crucial to ensure your IE rods stay inside of your engine block.
INSTALLATION SUPPORT
The following information is supplied as best practices and tips for your connecting rod installation and not intended to be used as a complete install guide.
Engine assembly should always be performed by a trained technician with professional tools.
BEFORE YOU BEGIN
Prepare a clean indoor work surface such as a stainless bench. Unpack your rods, remove the rod bolts with an 11mm 12 point socket, and split the bearing caps from the rods. Use brake cleaner with a lint-free rag to remove all rust inhibitor oils from the surface, threads, journals, bushings, and rifle drilling channel (if present). Visually inspect all rod surfaces.
TOOLS & SUPPLIES:
- Socket wrench
- 11mm 12 point socket
- Torque wrench (quality & calibrated)
- Dial bore gauge
- Secured bench vise
- Bolt stretch gauge (optional)
- thread tap/thread gauge (optional)
- ARP bolt lube (supplied with rods)
- Marker
- Carb cleaner
- Lint-free rags
VERIFY CLEARANCES
Before installing your connecting rods into the engine, all critical clearances should be measured and recorded. Label each rod, bearing set, crankshaft journal, and wrist pin 1-4 with a marker to keep track of your measurements. Using a vice, assemble the rod with the rod bearings, rod bolts, and ARP assembly lube. Torque the rod bolts using the torque procedure on this page. Make sure the printed numbers on the rod and rod cap match and are installed on the same side.
Using a quality bore gauge and micrometer, record the following measurements:
- Wrist pin diameter
- Wrist pin bushing bore
- Wrist pin clearance (Bore minus diameter | Target: .0003"-.0005")
- Rod journal (w/bearings)
- Crankshaft journal diameter
- Journal clearance (Bore minus diameter | Target: .0015"-.0025")
Measure clearances with a quality bore gauge and micrometer only, do not use a Plastigage type product.
SPEC SHEET
Taking the time to measure and verify all critical clearances of the rotating assembly can be the difference between bullet proof reliability or a costly engine rebuild. Building a record of these details can identify issues and provides a reference during assembly or later diagnosis. To help make your engine build a success, download our official IE Engine Specification Sheet.
TORQUE PROCEEDURE
Accurate rod bolt pre-load is required to ensure proper bore clearances and roundness of the connecting rod big end for both measuring and final installation of your connecting rods. Before you begin, clean the rod mating surfaces and remove all packaging oil from the threads and rod bolts.
STEP 1 -SEATING THE ROD CAPS:
Before you final stretch your rod bolts, it's important the bolt and rod threads are fully seated.
- Install rod bearings
- Align matching printed numbers on rod and cap
- Assemble cap to rod
- Apply ARP assembly lube to bolt threads
- Hand tighten bolts
- Using a quality calibrated torque wrench, torque bolts to 50 ft/lbs
- Break bolts loose, and again torque to 50 ft/lbs
- Break bolts loose, then torque to 50 ft/lbs one final time
STEP 2 -FINAL TORQUE:
The final torque spec is .006" (stretch gauge) or 50 ft/lbs (torque wrench) with ARP assembly lube. The preferred method of measuring bolt load is with a stretch bolt gauge.
Stretch Gauge
- Loosen bolt and zero stretch gauge
- Tighten bolt to .006" stretch
- Loosen second bolt and zero stretch gauge
-
Tighten second bolt to .006" stretch
Torque Wrench
- Loosen bolt
- Tighten bolt to 50 ft/lbs
- Loosen second bolt
- Tighten second bolt to 50 ft/lbs
Important notes
- Do not exceed rod bolt stretch/torque. If bolt stretch is exceeded, replace rod bolts with new ones.
- Torque wrench settings are given as a guide only, to ensure proper bolt installation a stretch gauge is required.
- Do not install bolts dry or with any other lubricant than the supplied ARP assembly lube.
Have questions? Don't worry, our team of engine specialist are here to help. Fill out the form on our Contact Page to start a help ticket.